
Ventilator Settings for Nurses
In today’s episode, we will talk about ventilators and how they can help healthcare professionals treat patients.
Not every nurse will have a patient on a ventilator or work directly with it, but most emergent situations require one.
It is always good to at least know the basics of a ventilator, so as a nurse, you know how you can use it if a situation arises.
Mechanical Ventilation
Mechanical ventilation is an invasive way to provide oxygen to someone who is unconscious or needs help breathing. This machine is usually seen around ICUs or hospice care settings.
A mechanical ventilator is a machine that assists with oxygenation and directly inflates and deflates the lungs. It is used in a variety of situations like surgery and emergencies.
Ventilator settings are inputs on a machine that determines how much support the patient needs. When we program a ventilator to a specific setting, we account for two things: oxygenation and ventilation.
- Ventilation is the process of inhaling and exhaling.
- Oxygenation is the process of adding oxygen to the body [1].
When is Mechanical Ventilation Needed?
- Respiratory failure
- failure to oxygenate
- Failure to ventilate
- Airway protection
- Concerning findings include:
- Respiratory rate > 30/minute
- Inability to maintain arterial oxygen saturation > 90% pH < 7.25
- PaCO2 > 50 mm Hg (unless chronic and stable)
Respiratory Mechanics
Normal inspiration generates negative intrapleural pressure. In return, this creates a pressure gradient between the atmosphere and the alveoli that result in airflow.
In mechanical ventilation, the pressure gradient results from increased (positive) pressure of the air source.
Peak airway pressure
- The peak airway pressure is measured at the airway opening and is routinely displayed by mechanical ventilators.
- It represents the total pressure needed to push a volume of gas into the lungs and is composed of pressures resulting from inspiratory flow resistance (resistive pressure).
- The elastic recoil of the lung and chest wall (elastic pressure), and the alveolar pressure present at the beginning of the breath (positive end-expiratory pressure, PEEP)
- Peak airway pressure = resistive pressure + elastic pressure + PEEP
Resistive pressure
- Resistive pressure is the pressure from the circuit resistance and airflow. In the mechanically ventilated patient, resistance to airflow occurs in the ventilator circuit, the endotracheal tube, and, most importantly, the patient’s airways.
Elastic pressure
- The pressure of the elastic recoil of the lungs and chest wall and the volume of gas delivered. For a given volume, elastic pressure is increased by increased lung stiffness (as in pulmonary fibrosis) or restricted excursion of the chest wall or diaphragm (eg, intense ascites or massive obesity). Because elastance is the inverse of compliance, high elastance is the same as low compliance.
End-expiratory pressure
- The end-expiratory pressure In the alveoli usually is the same as atmospheric pressure. However, when the alveoli fail to empty because of airway obstruction. It could be airflow limitation or shortened expiratory time; end-expiratory pressure may be positive relative to the atmosphere.
- This pressure is called intrinsic PEEP or autoPEEP to differentiate it from externally applied (therapeutic) PEEP. It is created by adjusting the mechanical ventilator or by placing a tight-fitting mask. This mask applies positive pressure throughout the respiratory cycle.
- The pressure is given in the expiratory phase to prevent the closure of the alveoli and allow increased time for O2 exchange.
- Used in patients who haven’t responded to treatment and require a high amount of FiO2.
- PEEP will lower O2 requirements by recruiting more surface area.
- Normal PEEP is approximately 5cmH20. Can be as high as 20cmH20.
Intrinsic PEEP (auto-PEEP)
- Intrinsic PEEP or auto-PEEP can be measured in the passive patient through an end-expiratory hold maneuver. Immediately before a breath, the expiratory port is closed for 2 seconds. Flow ceases, eliminating resistive pressure. Thus resulting pressure reflects alveolar pressure at the end of expiration (intrinsic PEEP).
- Accurate measurement depends on the patient being completely passive on the ventilator. It is unwarranted to use neuromuscular blockade. Solely to measure intrinsic PEEP.
- A non-quantitative method of identifying intrinsic PEEP is to inspect the expiratory flow tracing. Check if the expiratory flow continues until the next breath of the patient. If the patient’s chest fails to come to rest before the next breath, intrinsic PEEP is present.
- The consequences of elevated intrinsic PEEP are increased inspiratory work of breathing and decreased venous return. This may result in decreased cardiac output and hypotension.
Airway Management
- Airway cuffs
- An inflated cuff helps with holding the airway in place
- Reduces tidal volume loss
- Decreases chance of aspiration
- If a patient can speak, makes a weird noise from the cuff, or loses tidal volume, the cuff most likely needs more air.
Ventilator Settings and Modes
When you’re looking at the ventilator screen, it can be a little overwhelming at first. There are a lot of numbers, letters, and words. It is essential to also not change any of those settings if you are unsure about operating it [2].
Ventilator Settings
Tidal volume
The tidal volume is the air moving in and out of the lungs. The average adult breathes about 7 milliliters per kilogram of body weight. For males, the average Vt is 500 ml, and for females, about 400 ml.
- Minute ventilation
- The amount of volume inhaled and exhaled over 60 seconds. The average range is between 4 and 6 liters.
- VE can be increased by taking deeper breaths or increasing the respiratory rate.
- Alveolar ventilation
- VA is similar to VE but without including dead space. Dead space is the air that is not undergoing active gas exchange.
- VA can be increased by breathing harder.
When the volume is too high, there is a risk of overinflation. However, when the volume is too low, it allows atelectasis.
Frequency (Rate)
Respiratory rate is the number of breaths per minute. The average amount of breaths a person takes is 16. The vent can be programmed to deliver x amount of breaths a minute.
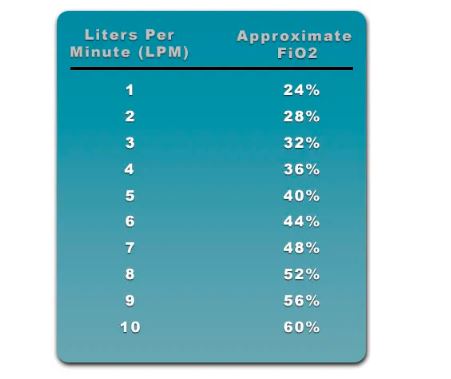
FiO2
The FiO2, or fraction of inspired oxygen, is the concentration of oxygen that the patient is inhaling. The FiO2 of room air is about 21%. It is good to know that when you use a flow rate of 1, it increases the FiO2 to 24%. For every liter, after that, it increases FiO2 by 4%.
- For patients with severe hypoxemia, a FiO2 of 100% may be required when mechanical ventilation is initiated. But your goal should be to wean the FiO2 down to the lowest possible level. That way, it provides adequate oxygenation.
- If a patient receives a FiO2 > 60% for a prolonged period, it increases their chances of oxygen toxicity.
Flow Rate
- If the flow rate is set too low, it could result in patient-ventilator dyssynchrony and an increased work of breathing.
- If the flow rate is too high, it could decrease mean airway pressure.
I:E Ratio
The I:E ratio refers to a ratio of the inspiratory portion compared to the expiratory portion of the breathing cycle.
- For patients on the ventilator, the normal I:E ratio is between 1:2 and 1:4. A larger I:E ratio may be delivered if a patient is in need of a longer expiratory time. It could be due to the possibility of air trapping.
- The I:E ratio can be adjusted by making changes to the flow rate, inspiratory time, expiratory time, tidal volume, and frequency settings.
Sensitivity
Differences between PEEP, Pip, Pplat, and Alarms
PEEP
Peak Insp. Pressure (Pip)
Pip is the maximum pressure during inspiration. The goal is to have it under 35, with the goal of preventing lung injury.
Plateau Pressure (Pplat)
Pplat measures lung compliance. This is measured at the end of inspiration with a hold, the goal is to have it under <30.
Alarms
A ventilator alarm is a safety mechanism on a mechanical ventilator. It uses set parameters to provide alerts whenever there is a potential problem. This problem could be related to the patient-ventilator interaction.
- High Pressure
- Low Pressure
- Low Expired Volume
- High Frequency
- Apnea
- High PEEP
- Low PEEP
Primary Control and Modes
In mechanical ventilation, there are two primary control variables [3]:
1. Volume Control
-
The cons of using Volume Control are that the tidal volume is preset, and a patient’s lung is weak. It can result in high peak pressures.
-
Another drawback of Volume Control is patient-ventilator dyssynchrony.
2. Pressure Control
-
The main disadvantage of using pressure control is the patient’s tidal volume. It can be unstable if there are changes in the patient’s lung compliance or airway resistance.
-
The sensitivity control can also be adjusted to make it easier or harder for the patient to start a breath.
When to use a Ventilator
-
One of the advantages of using Assist/Control is that it keeps the patient’s breathing needs very low.
Synchronous Intermittent Mandatory Ventilation (SIMV) Mode
In this mode, the ventilator delivers a preset small number of mandatory breaths. But it also allows the patient to start spontaneous breaths between the mandatory breaths.
This mode also allows the operator to set either a controlled pressure or a controlled volume.
When to Use SIMV?
Advantages of Using SIMV
To catch up on the full episode of Ep. 158, click here for more 👇
TIMESTAMPS:
00:00 Intro
00:45 Plugs
02:04 Podcast Introduction
04:19 When is Mechanical Ventilation Needed?
07:59 Respiratory Mechanics
10:14 Peak Airway Pressure
12:41 End-expiratory pressure
13:31 Intrinsic PEEP (auto-PEEP)
15:21 Air management Tips
17:42 Mode & Settings: Tidal Volume Mode
21:56 Mode & Settings: Frequency (Rate)
22:59 Mode & Settings: FiO2 – Fraction of Inspired Oxygen
26:27 Mode & Settings: Flow Rate
27:53 Mode & Settings: I:E Ratio
30:12 Mode & Settings: Sensitivity
32:27 Mode & Settings: PEEP
34:51 Primary Control and Modes: Volume Control
37:13 Primary Control and Modes: Pressure Control
38:23 Primary Control and Modes: Assist/Control (A/C) Mode
39:23 Primary Control and Modes: Synchronous Intermittent Mandatory Ventilation (SIMV)
42:56 Learn the basics
45:45 Dealing with ventilator alarms
46:28 Criteria for weaning off the ventilator
54:16 Wrapping up the episode